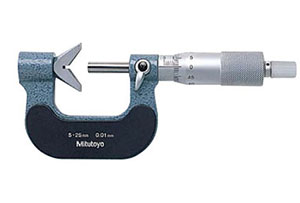
Eight steps of the micrometer:
1. Select the appropriate range of micrometers according to the size to be measured.
2. Before use, check if the micrometer has a calibration label and check if the calibration date is within the service period.
3. Clean the measured surface of the measured object directly with dust-free paper.
Fourth, clean the parts of the micrometer. Use a piece of clean white paper between the two measuring surfaces, gently pull the paper with appropriate measuring force, then release it to check whether the two measuring surfaces are clean. If it is not clean, repeat this action until it is clean.
5. Return to zero: If the range is 0~25mm, rotate the outer sleeve so that the two measuring surfaces are in close contact with each other. Check the “0” point. The line position is aligned with the center axis reference line and then reset to zero and press the “ZERO” button. Zero the display. If the micrometer of 25~50mm or 50~75mm is clamped between the two measuring surfaces with a 25mm or 50mm block gauge (this gauge can also be used for the micrometer proofing rod), gently turn to check that the reference reticle position is aligned on the same line. Return to zero.
6. Measurement: Rotate the outer sleeve of the micrometer so that the distance between the two measuring surfaces is larger than the dimension to be measured. The measuring surface touches the reference surface of the workpiece. The axes of the two are as perpendicular as possible, and the appropriate measuring force is applied by the ratchet. It is better to idle the ratchet 2~3.
Seven, read the measured value.
8. After use, leave a gap of 1~2mm between the two measuring surfaces, and turn off the power to put the instrument into the box.